Cinematic Facial Rig for UDK/CryEngine

Hey Everyone!

I’m working on my graduate studies thesis right now building facial rigs for a cinematic scene in UDK. It’s sort of a test of UDK’s capabilities.

So here’s the question:

What type of bone count can UDK handle, and what would be pushing it? Also, how could blend shapes be useful if I don’t have a program like Face FX?

I’ve built a facial rig with bones and blend shapes before, but not directed towards putting in game. If anybody has any experience, advice, or thoughts on this, I’d love to hear it!

Thanks!

What type of bone count can UDK handle, and what would be pushing it?

Unreal can support 255 bones for your whole mesh. depending on your character, that may not leave much for a face. For Gears, I used 40 bones, but since unreal does not support non-uniform scale on joints, we used morph targets for corrective work.

Going back to bone counts for a minute though, our gears bipeds, sans face, were 70 bones, so you still have a lot of bones available for the face. I do not believe that more bones == better rig, but you have lots of room to play with there.

Onto morphs, aside from corrective shapes, I also use morphs to drive material parameters for blending in normal maps and other effects. In unreal, in the morph target editor/viewer, you can select a morph, and in the properties, there are 2 fields, 1 for index and 1 for parameter name. Index being the material index of that character, and then you can setup a parameter in that material to drive with animation. Kinda hacky, but it works great for having animation controlled material parameters.

this goes over the gears 3 system:

http://www.unrealengine.com/files/downloads/Jeremy_Ernst_FastAndEfficietFacialRigging2.pdf

A lot has changed on it since then, but this goes over the face rig that was used for cinematics.

Been following along and working on doing pretty much the same thing for my reel. That article’s definitely a great help Jeremy!

Jeremy can correct me if I’m wrong, but there is one more thing to note with bone counts in Unreal.

If you go above 75 bones that influence deformation, Unreal will split it into an additional chunk. If you can, you want to keep your section/chunk count down for performance reasons, so it’s best not to go over 75 if possible. Bones that don’t influence deformation shouldn’t be counted.

True enough. Didn’t mention as he specified cinematic rigs. For our in game meshes we kept them at 75. Our cine meshes had two chunks though. Probably isn’t as important for a thesis as it is for production.

thanks Jeremy! knowing that info about UDK, and having this presentation will definitely come in handy.

Whoops, I missed the part about cinematic. Well, always good to have the information out there anyway, I suppose :):

definitely good to have the information. I appreciate all the input! I definitely want my thesis/project to cover everything I’ve learned along the way.

I need some help from the pros again :x:

I’ve been tweaking this and trying new solutions for my mouth controls, but I think I haven’t found the right combination to get this to work perfectly.

I’ve parented, re-parented, and constrained myself into confusion I think.

A fresh set of eyes, and any ideas would be great!

I dont think you can achieve that result from simple parenting and constraining. In order to get the lower lip controls to move with both the jaw and the blue control you’ll have to take the transforms of them both and merge them together to output a single transform to drive the lower lips.

Also by taking the transform result of them both you could probably easily dial them out, allowing the user to move/rotate the jaw and not effect the lower lips if they wanted.

The awkward part is that you’re probably dealing with rotations affecting translations, so you’d most likely want to work in matrices to get the cleanest result. I am not in front of Maya at the moment so i dont know if there are matrix multiplication nodes built in, if not it should be fairly accessible through the MMatrix and MTransformation matrix classes in the SDK.

That may be a little more effort than you imagined though.

Mike

Hi,

nice and clean rig so far. :wink:

You can take a closer look into the rigs Image Metrics has:

http://www.image-metrics.com/community/forumdisplay.php?26-Character-Rigs

These are pretty helpful as a reference regarding the rig structure.
“El Tom” is the right one for you.

In the outliner you can see that every control(nurbs-curve) is nested in individual groups that have zeroed out translation and rotation attributes.

This way you can have a individual groups only for your blue circle lip control, and one group for your jaw control. Every control itself is the last child of this group hierarchy without any animation at all and is full controllable.
In my face rigs I call those groups “tiers”(*_tier1, *_tier2) in order to allow me to read it in a more layered structure. You can see it in the image metrics rigs as well for the different shapes they set up, e.g. “ooo”, “eeehh” etc.

Now comes the tricky part as far as your rig has this hierarchy. Which tier, layer or group will be the first to let your animator adjust the lips. The blue control or your jaw control? You can decide to go either way.
For example:

group_jaw_controlled_ctrl_left_lip_mid
|-> group_lip_master_controlled_ctrl_left_lip_mid
|->ctrl_left_lip_mid

group_jaw_controlled_ctrl_right_lip_mid
|-> group_lip_master_controlled_ctrl_right_lip_mid
|->ctrl_right_lip_mid

This way you control your lips translation over the jaw control first.
After that you can move their position due to the blue control’s position.

How you gonna constrain(position, orient, parent) each group is up to you.

MikeM’s sugestion is for the ultimate best and cleanest result, but maybe it’s too much for your thesis. :wink:

Cheers,

Chris

Mike,

I found a Vector Product utility as well as a Matrix Add in the Hypershade. I’m not sure if those are what you had in mind, but i somewhat understand what you’re talking about.

Chris,

I actually did take a lot of tips from the Image Metrics ElTom rig, but when I began this joint only rig, I didn’t have any experience with one before, so I’ve been climbing that learning curve.

I knew the individual grouping was important, but now I think I understand how the translations of groups are actually working in a hierarchy. Your explanations and tips definitely clarified that.

MikeM’s sugestion is for the ultimate best and cleanest result, but maybe it’s too much for your thesis.

Interesting. I’d like to understand a bit more about why that is. I’m assuming it has something to do with the utility computing the transformation output, rather than dealing with so many translations down the hierarchy.

Thanks for your input! Look forward to hearing more. I’ll also let you know if i run any anymore issues :stuck_out_tongue:

[QUOTE=justjamij;14029]Interesting. I’d like to understand a bit more about why that is. I’m assuming it has something to do with the utility computing the transformation output, rather than dealing with so many translations down the hierarchy.
[/QUOTE]

Yea, thats a large part of it. Both systems will work, and actually both are more than valid. I think in this situation the ‘cleanliness’ simply comes from the fact that to understand and alter the system will depend only on one node and its inputs and outputs. Whilst dealing with hierarchial structures, where each node could be doing something different can grow awkward and hard to manipulate over time.

It’s a balance though, single nodes that get written for specific tasks can also become a burden if they’re made too complicated. Its just a case of finding the balance and breaking things down to a level you feel comfortable with. At the end of the day, the only people that will see the ‘under the hood’ stuff is you and any other riggers, so build in a way you all understand.

As a slight side topic, if you do go down the route of custom nodes, its worth considering how your graph will be evaluated when trying to decide how granular your nodes may have to be. You dont want to be forcing nodes to refresh when they dont need to be etc.

Mike.

Hi.

For the human kind of face rigs I’ve to build for our projects I take into consideration that if the jaw opens the actual facial behaviour would result in an overall movement of the flesh and muscles on our cheeks and even the nose.
This means I had to reproduce this face in a simple manner.
So if you have a jaw joint which is a child of the head joint as well as the rest of the face joints you need to drive these “free” joints when the jaw is being rotated.

Bones:
jnt_head:
|-> jnt_jaw
|-> jnt_mid_lowerLip
|-> jnt_mid_upperLip
|-> jnt_left_nostril

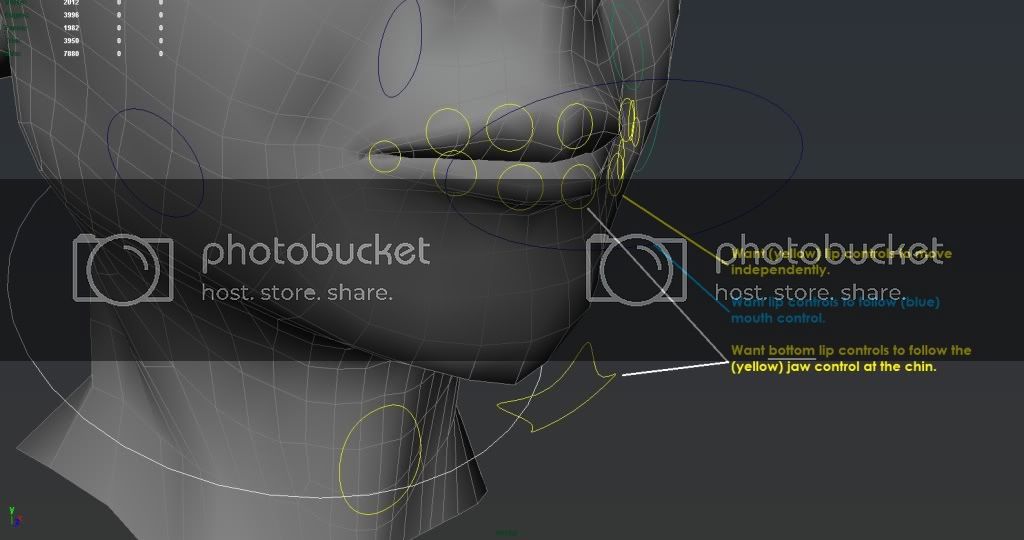
These are our kind of levels of movement influences. The jaw should influence the lower lips more than the upper lips and just a bit the nostrils and nose tip.
To reproduce this we are going to set four stages each stage consisting of a individual group:

ctrl_head:
|-> ctrl_jaw_grp
|-> ctrl_jaw_lower_grp
|-> ctrl_jaw_mid_grp
|-> ctrl_jaw_upper_grp

All of the groups need to have zeroed out rotations!

Now comes the clue! :slight_smile:
ctrl_jaw_grp is the one that will be cotrolled by your nurbs curve by an orient or parent constraint.
This means, if the control is moved/rotated the group will move too. Now, we need to distribute different values/influences between the ctrl_jaw_grp and the rest jaw groups.
Therefore we create a multiply/divide node which is a auxiliary render node. It has an input(x,y,z) the multiplicator(x,y,z) and the resulting values(x,y,z). For each jaw group we create an individual multiply/divide node indicating the different influences stages/levels I mentioned earlier.
Let’s say we have these values as influences:
ctrl_jaw_grp -> 80% -> ctrl_jaw_lower_grp
ctrl_jaw_grp -> 50% -> ctrl_jaw_mid_grp
ctrl_jaw_grp -> 20% -> ctrl_jaw_upper_grp

That means we connect the rotations of ctrl_jaw_grp into the input of each multiply divide node and set the multiplicator to the right percentage:
80% = 0.8
50% = 0.5
20% = 0.2

Every node is set to multiply.
As you would guess we do connect the result of these nodes to the correct jaw groups.
Now you can rotate your control or ctrl_jaw_grp and see how the other groups follow concurrently.
It is important to parent(hierarchy in outliner) the right groups for each face control under these jaw-level-groups.
For example I have a chin group, every low lip group and more parented:
ctrl_head:
|-> ctrl_jaw_grp
|-> ctrl_chin_grp
|-> ctrl_jaw_lower_grp
|-> ctrl_mid_lowerLip_grp
|-> ctrl_right_lowerLip_grp
|-> ctrl_left_lowerLip_grp
|-> ctrl_jaw_mid_grp
|-> ctrl_left_mouthCorner_grp
|-> ctrl_right_mouthCorner_grp
|-> ctrl_jaw_upper_grp
|-> ctrl_left_nostril_grp
|-> ctrl_right_nostril_grp
|-> ctrl_nose_grp

That’s all.
I have to add that each controller is nested in several groups, the tiers I was earlier referring to. This way I still have more individual control over one control. But the groundwork for the jaw opening is done with this rig’s approach.

Conclusion:
Mouth open -> distributed movement among the controls from top to bottom of the human face. :slight_smile:

Thanks for that info Chris, that was what I always did but I used parent constraints and blended the weights between them, this worked most of the time but resulted in some weird flipping on random joints when the neck was rotated in certain positions. Using MD nodes seems like it will be more stable.

Hi Matt,

I’m heavily using render-nodes to speed up the rig’s calculation. Years ago I read a nice article about using render-nodes instead of constraints. It mostly dealt about how much constrains can slow down the complete maya scene.
Another good node is the blend-node which comes handy using different rotation/translation inputs and blend between seem seamlessly.
Works very good! :slight_smile:

Chris

You probably want to make one (or several) parents to your controllers that has driven keys for their positions & orientation driven by the other controllers. Then make sure that the controllers themselves use local-space for their mapping to your actual bones; if the bones are parented. If everything is in “face-space” you can probably map in world-space.

EDIT: Ooops. This was a reply to the bottom thing on page 1. Didn’t see that the post had 2 pages. It’s early morning here. =)

so I just got this fun warning from UDK after unchecking “Anim Rotation Only” that has shown no results when I tried to Google its meaning.

“Warning: WILL BE BROKEN IN GAME!!! Test (the name of my animation) needs to be recompressed; displaying RAW animation data only”

It’s pretty funny…having 3 exlamation points and all. Has anyone see this before in UDK?

I just got this as well and can also not figure out what it means or how to fix it. Did you have any luck?